
Disclaimer
This written crochet pattern cannot be copied, resold, or redistributed in any way. Producing and posting a video in any platform inspired by my pattern, and sharing instructions written in this pattern is strictly prohibited.
However, selling finished products with the use of this pattern is permissible so long as the designer is properly informed and rightfully credited.
🧶 Materials
- Crochet hook: Size 2.5mm/4.0mm
- Yarn:
Beige/ 100%Cotton | WPI 29 | Size0
Brown/ Acryl 100% | WPI19 | Size1
Lite Brown/Acryl 100% | WPI11 | Size3 - Stuffing
- Scissors
- Stitch markers
-
Darning needle
🐶 Finished Size

⚠️Notes
※The number in parentheses ( ) indicates the total number of stitches in that round.
※The starting chain (ch) at the beginning of a round is not counted as the first stitch.
※For patterns that begin with a magic ring, the starting chain is omitted from the written instructions. However, it is still necessary to make a starting chain at the beginning of each round. Please remember to include it.
📝Abbreviations

✏️Pattern
🐶 Snoopy Face ×10
Hook: Size 2.5mm
R1: Magic ring, 6 sc (6)
R2: scinc ×6 (12)
R3: (sc 1, scinc) ×6 (18)
R4–R7: sc ×18 (18 each round)
R8: sc 3, (sc 1, scinc) ×4, sc 7 (22)
R9: sc 3, (sc 2, scinc) ×4, sc 7 (26)
R10–R12: sc ×26 (26 each round)
R13: sc 1, (sc 4, scdec) ×4, sc 1 (22)
R14: sc ×22 (22)
R15: sc 1, (sc 3, scdec) ×4, sc 1 (18)
R16: sc 1, (sc 2, scdec) ×4, sc 1 (14)
R17: sc 1, (sc 1, scdec) ×4, sc 1 (10)
R18: scdec ×5 (5)
→ Cut yarn leaving 20cm, close the opening with a darning needle, and weave in the tail.
Stuff as you go.
🐶 Nose ×10
Hook: Size 2.5mm
R1: Magic ring, 8 sc (8)
→ Leave a 20cm yarn tail for sewing onto the face.
🐶 Snoopy Ears ×20
- Ch 5
- In the back bumps: slst, sc, hdc, dc×4
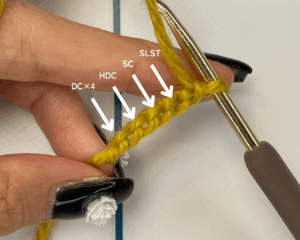
- On the other side of the chain: hdc, sc, slst
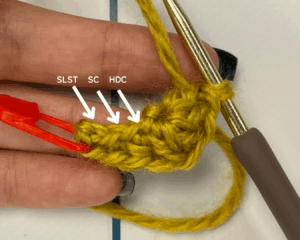
Slst into the first slst (marked with red) .
Leave a 20cm yarn tail for sewing onto the face.
Embroider eyes and mouth by threading yarn, referring to photos for placement.
🍦 Cone
Hook: Size 4.0mm
R1: Magic ring, 6 sc (6)
R2: (sc 1, scinc) ×3 (9)
R3–R4: sc ×9 (9)
R5: (sc 1, scinc, sc 1) ×3 (12)
R6–R7: sc ×12 (12)
R8: (sc 3, scinc) ×3 (15)
R9–R10: sc ×15 (15)
R11: (sc 2, scinc, sc 2) ×3 (18)
R12–R13: sc ×18 (18)
R14: (sc 5, scinc) ×3 (21)
R15–R16: sc ×21 (21)
R17: (sc 3, scinc, sc 3) ×3 (24)
R18–R20: sc ×24 (24)
R21–R23: Turn work inside out and crochet in back loops only (BLO) with sc (24)
→ [How to do BLO crochet here]


Turn the BLO section (R21–23) inside out to finish.


🍦 Top of Cone
Hook: Size 2.5mm
R1: Magic ring, 6 sc (6)
R2: scinc ×6 (12)
R3: (sc 1, scinc) ×6 (18)
R4: (sc 1, scinc, sc 1) ×6 (24)
R5: (sc 3, scinc) ×6 (30)
R6: (sc 2, scinc, sc 2) ×6 (36)
R7: (sc 5, scinc) ×6 (42)
R8: (sc 3, scinc, sc 3) ×6 (48)
R9: [sc, (dc, hdc), (dc, hdc), sc] ×12 (72)
→ Leave a 40cm yarn tail for sewing to the cone base.
🍫 Chocolate Stick
Hook: Size 2.5mm
R1: Magic ring, 8 sc (8)
R2–R18: sc ×8 (8 each round)
→ Leave a 20cm yarn tail for sewing to the ice cream top.
🍦 Assembly
Sew the cone top to the base, closing it like a lid. Stack and attach the Snoopy heads on top in a tower shape. If sewing is difficult, use a hot glue gun instead. Sew the chocolate stick on top to finish.